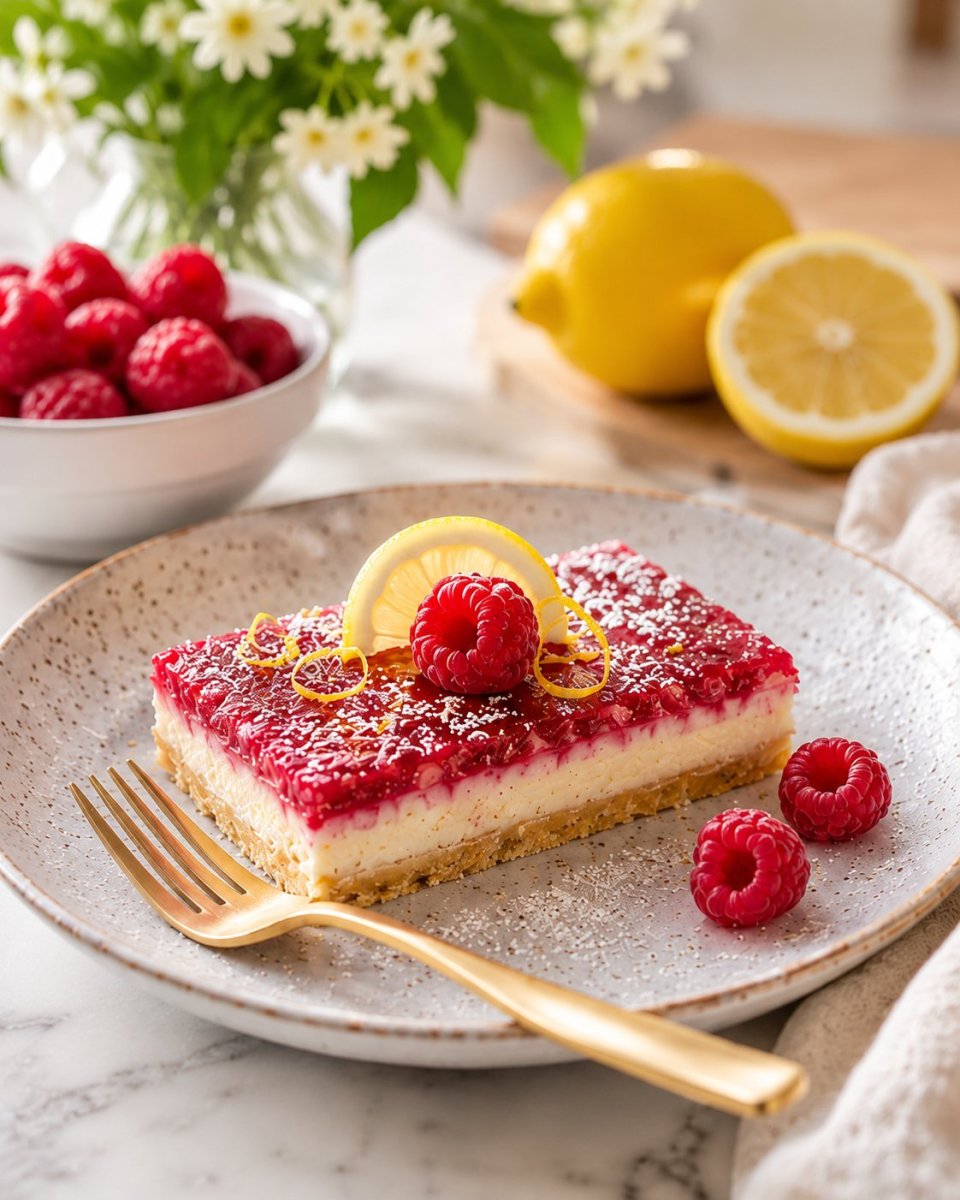
Three layers. No oven. Every bite somewhere between a cheesecake and a lemon tart — except this one is made entirely from plants, sets in the freezer, and tastes like you spent all afternoon on it. You did not. These no bake lemon raspberry bars come together fast, look stunning, and disappear even faster.
The base is a chewy coconut date crust with a hit of lemon zest and fleur de sel. The filling is a silky cashew cream with fresh lemon juice that sets into something thick and smooth and unapologetically tangy. And the top — a bright raspberry layer made with nothing but raspberries, dates, and lemon juice. The color alone will stop you mid-scroll.
Why These No Bake Lemon Raspberry Bars Work So Well
Most raw desserts lean sweet. These lean tart — and that is what makes them. The lemon does the heavy lifting, the raspberries balance it with just enough berry sweetness, and the coconut date base grounds everything with a soft chew that holds it all together.
The lemon layer is the heart of this recipe. It is built on soaked cashews blended with fresh home-made cashew milk, lemon juice, and lemon zest until completely smooth. The result is a filling that feels rich and creamy without any dairy, oil, or coconut cream. Just cashews and citrus doing what they do best.
What really sets this recipe apart is the cashew pulp in the base. If you make your own cashew milk at home with a Nama M1 plant-based milk maker, you already have fresh pulp left over from every batch. That pulp is still full of fiber and subtle flavor — and here it becomes part of the crust, adding body and a soft, almost cakey texture. The full breakdown of how the M1 works and why it produces a different kind of milk is covered in The Nama M1 Plant-Based Milk Maker: Cold-Press Milk Without Heat or Blending.
What Soaking Does to the Cashews (And Why It Matters)
The lemon layer calls for cashews soaked for four hours. That is not a suggestion — it is what makes the filling smooth. Unsoaked cashews, even in a high-speed blender, leave a slightly gritty texture. Four hours in water softens the structure completely, so the filling blends into something genuinely silky.
But there is more happening than texture. Soaking activates enzymes in the cashew that begin breaking down enzyme inhibitors — compounds that naturally protect the nut but can make it harder for your body to absorb the nutrients inside. Once those inhibitors soften, the magnesium, zinc, and iron in the cashew become more available. The full picture of how that works is explained in Digestive Enzymes Explained: How Raw Foods and Juice Help You Absorb More.
Cashews are one of the richest plant sources of magnesium — a mineral that over half the population is not getting enough of. If you have ever noticed muscle tension, restless sleep, or low energy that sleep does not fix, magnesium is worth looking at. 6 Signs of Low Magnesium — and the Raw Foods That Fix It Every Day breaks that down clearly.
If you work with nuts and seeds regularly — whether for recipes, milk, or desserts — there is a free tool that makes soaking effortless. HowLongToSoak.com covers soaking times for dozens of nuts, seeds, legumes, and dried fruit, and it does more than just give you a number. It explains why soaking matters for each ingredient, what to do after soaking, shows nutritional highlights, and has a ready-by planner so you can time your soak around your schedule. It is one of those tools you use once and immediately bookmark for next time.

How to Make These No Bake Lemon Raspberry Bars
You need a food processor for the base and a high-speed blender for the lemon layer. The raspberry layer can go in either — it is forgiving. The whole process takes about 20 minutes of active work. The rest is waiting.
The base comes together quickly — you are looking for a mixture that sticks when pressed between your fingers. If it is crumbling apart, pulse a few more times. And when you press it into the pan, really press. Use the flat bottom of a measuring cup for even pressure. The firmer this layer is, the cleaner your bars will slice later.
The lemon filling is where patience matters. Blend it longer than you think you need to — you want zero graininess. Run your blender for a full minute, check, and go again if needed. When you pour it over the base, use the back of a spoon or an offset spatula to spread it evenly before it goes into the freezer.
The raspberry layer is the simplest part. It blends in seconds and pours right on top of the set lemon layer. Once all three layers are in, these no bake lemon raspberry bars need at least three hours in the freezer to firm up completely. Slice them while they are still frozen — this is the trick to getting clean, beautiful cuts through all three layers without anything smearing.
This no bake lemon raspberry bars recipe uses fresh cashew milk made in the Nama M1. If you do not have an M1, you can blend soaked cashews with water and strain through a nut milk bag — but the M1 produces a smoother, more naturally creamy milk because of the cold-press extraction, and the pulp it leaves behind is exactly what you want for the crust. Use discount code RAWFOODFEAST to save on the Nama M1 plant-based nut milk maker and all accessories.
Tips, Variations, and How to Store These Bars
Slice the bars while they are still frozen for the cleanest cuts. Then let the sliced bars rest for about one hour in the fridge, or 30 to 40 minutes at room temperature before eating. This brings the layers to a soft, creamy texture rather than an icy one.
If you do not have fresh raspberries, frozen work perfectly — no need to thaw them first. The blender handles them either way and the color stays just as bright.
For the sweetener in the lemon layer, light agave keeps the flavor clean and lets the lemon shine. Maple syrup works too but adds a warmer, slightly deeper note. Both are good — it depends on whether you want bright or cozy.
Store these no bake lemon raspberry bars in the freezer in an airtight container for up to two to three weeks. They also hold well in the fridge for two to three days, though the raspberry layer is most vibrant when they are freshly set.
Top them right before serving with fresh raspberries and a light scatter of coconut shreds. That contrast — cold, creamy no bake lemon raspberry bars with fresh fruit on top — is what makes the plate.
If you love raw desserts that look this good, the Carrot Pulp Cake with a Creamy Coconut Caramel Frosting uses the same zero-waste approach — juicer pulp turned into something you would happily serve at a dinner party.
Why No Bake Lemon Raspberry Bars Belong on Every Raw Dessert Table
You pull these out of the freezer, slice through three perfect layers, and suddenly everyone in the room wants to know what you made. Cashews. Dates. Raspberries. Lemon. That is the whole list. No oven, no dairy, no nonsense — just plants doing what they do when you let them.
No Bake Lemon Raspberry Bars (Raw, Vegan, Oil-Free, Gluten-Free)
Ingredients
Method
- Make the cashew milk first. Add 1 cup cashews and 2 cups water to the Nama M1 for extra creamy milk. Reserve ½ cup of the milk for the lemon layer and set the pulp aside for the base.
- Line an 8×8 inch (20×20 cm) pan with parchment paper, leaving overhang on two sides for easy removal.
- Add the pitted Medjool dates, cashew pulp, coconut shreds, lemon zest, and fleur de sel to a food processor. Pulse until the mixture sticks together when pressed between your fingers. Press firmly and evenly into the bottom of the lined pan.
- Add the soaked and drained cashews, fresh cashew milk, lemon juice, lemon zest, and agave or maple syrup to a high-speed blender. Blend until completely smooth with no texture remaining. Pour evenly over the base and smooth with the back of a spoon or offset spatula.
- Place the pan in the freezer for 30 minutes to let the lemon layer begin to firm up.
- Add the raspberries, pitted dates, and lemon juice to a blender. Blend until smooth. Pour evenly over the lemon layer.
- Return to the freezer for at least 4 hours or until fully set.
- Slice the bars while still frozen for the cleanest cuts. Slice the bars in 8 large rectangles or 16 squares (see notes). Then let the sliced bars rest for 1 hour in the fridge or 15-20 minutes at room temperature before serving. Optionally, top with fresh raspberries and coconut shreds to taste.
Nutrition
Notes
Tried this recipe?
Let us know how it was!